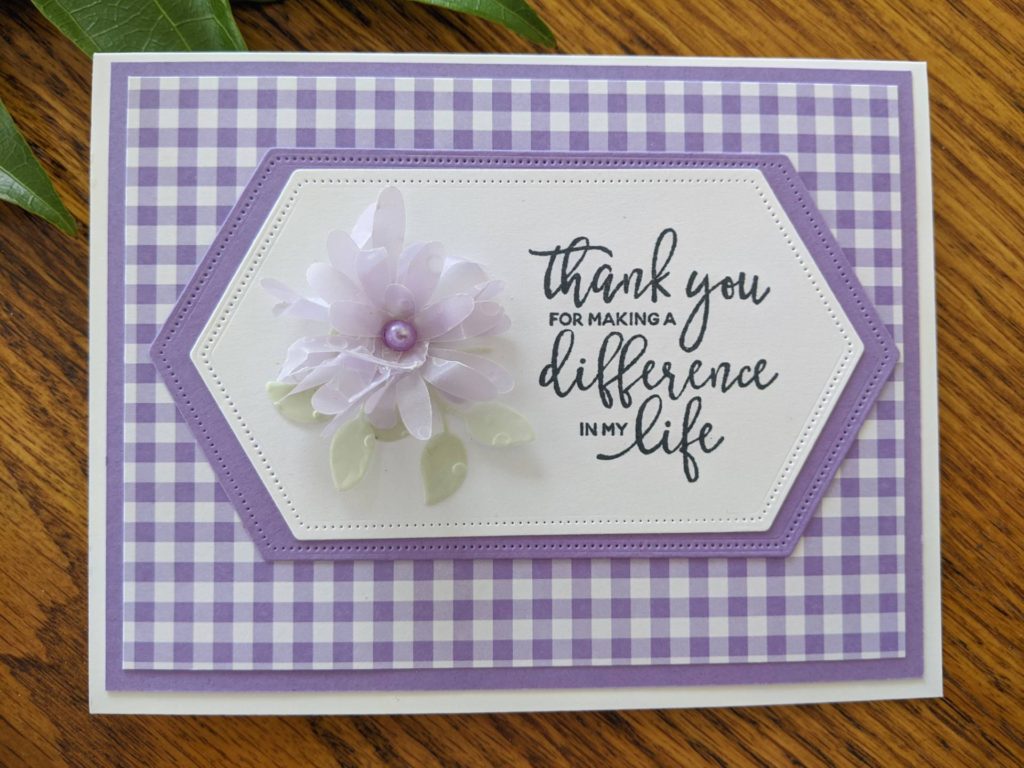
Have you seen the new Sale-A-Bration vellum paper? I just love it! The colors are beautiful and the embossing adds a little something extra. I fell in love when I first saw it and knew I had to do something special with it. So I made this flower card.
I was feeling Spring fever and wanted to make something light and airy. This fit the bill. It’s not hard to make and I made a video showing how. Go and watch it (and follow me!) and try it yourself.
This vellum is only available till the end of March 2020 with a $50 purchase so don’t wait to get your hands on it! The products used are listed under the video if you need any of them. Have fun making these darling vellum flowers.
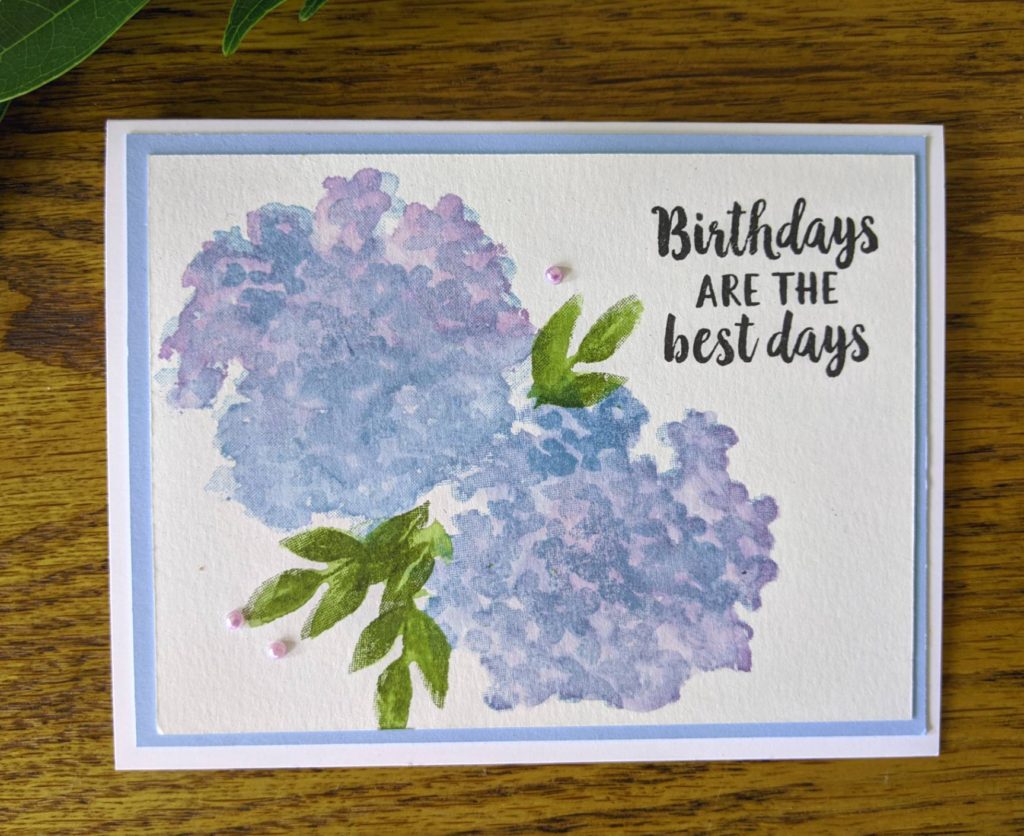
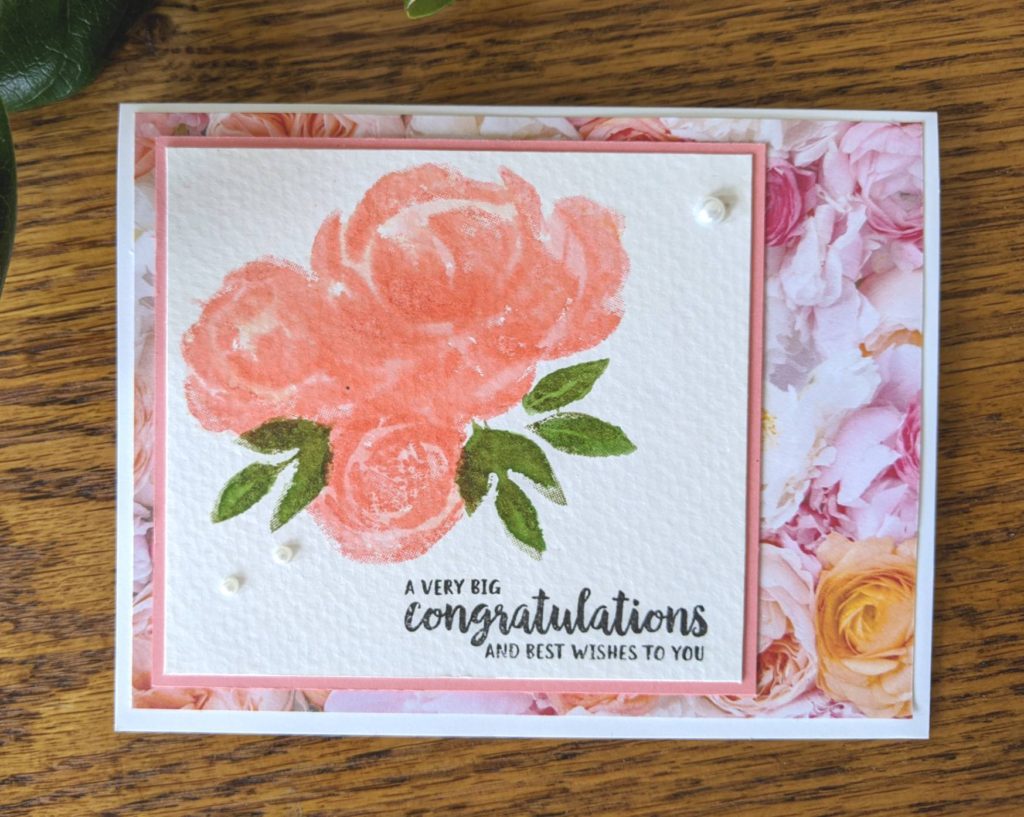
I have been having fun with a watercolor technique I learned recently, and I knew when I saw the Beautiful Friendship stamp set that I had to try it with these stamps. I had used it with the Timeless Tulips in one of my classes and loved the look so much, I had to try it with more images. So here are the results!
I used Highland Heather and Balmy Blue for the hydrangea flower and Pear Pizzazz and Old Olive for the leaves. On the rose I used Flirty Flamingo and Petal Pink.
We had so much fun in the class that I made a YouTube video to show those who missed the class how to do it. I hope you’ll go watch and try this fun technique.
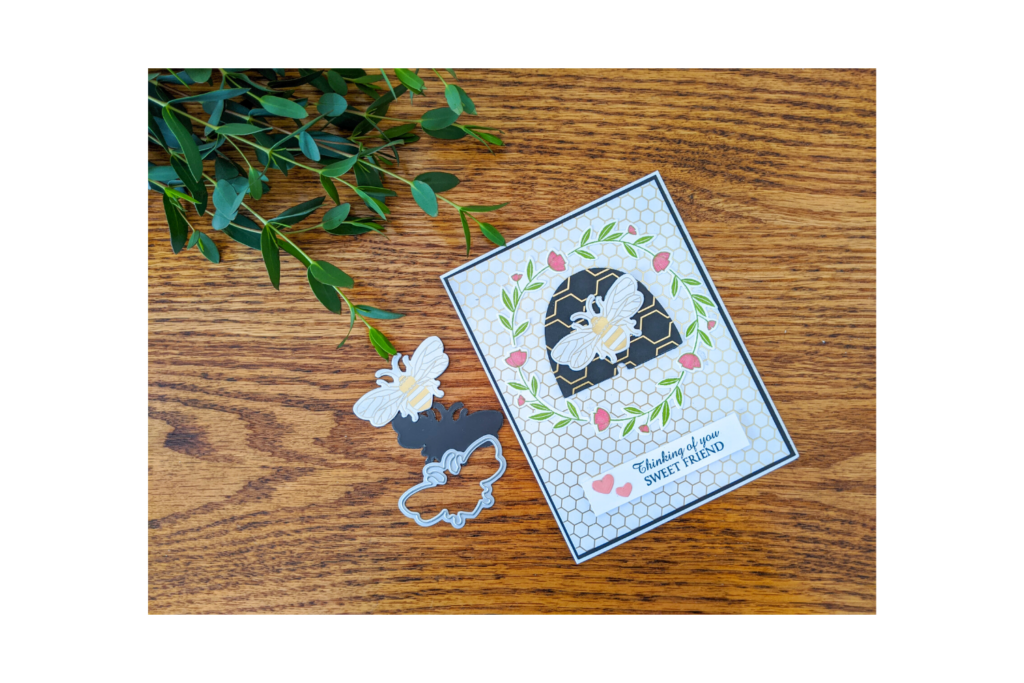
I had so much fun making the magnetic embellishment for this card. There is always some leftover magnetic sheet when I cut them for my dies, and I hate not using them. I have made magnets with them before, and I decided it was time to put them on a card.
The magnetic sheets I use are actually vent covers that you can find at your local home improvement stores. They work well for keeping your dies together. And for making magnetic embellishments!
When you cut the bee out, make sure you have the white side up, and for the hive, the magnetic side up. This way the magnets will be back to back so they stick together.
I usually run them through my die cut machine a couple times to ensure that they cut through. You may need to take scissors or a craft knife to some of the area if it didn’t cut all the way through. I haven’t had too many problems though. Just be careful when removing them from the sheet. Especially around delicate areas like the bee’s antenna. They can rip easily.
Here is a video I made showing how to make the bee and hive.
Video Tutorial
I cut the bee and hive out of the Golden Honey Specialty Paper that is one of the free products you can get with a purchase during Sale-A-Bration. Just put a little tombow glue on the paper and glue them on and you have your magnetic embellishment to go on your card.
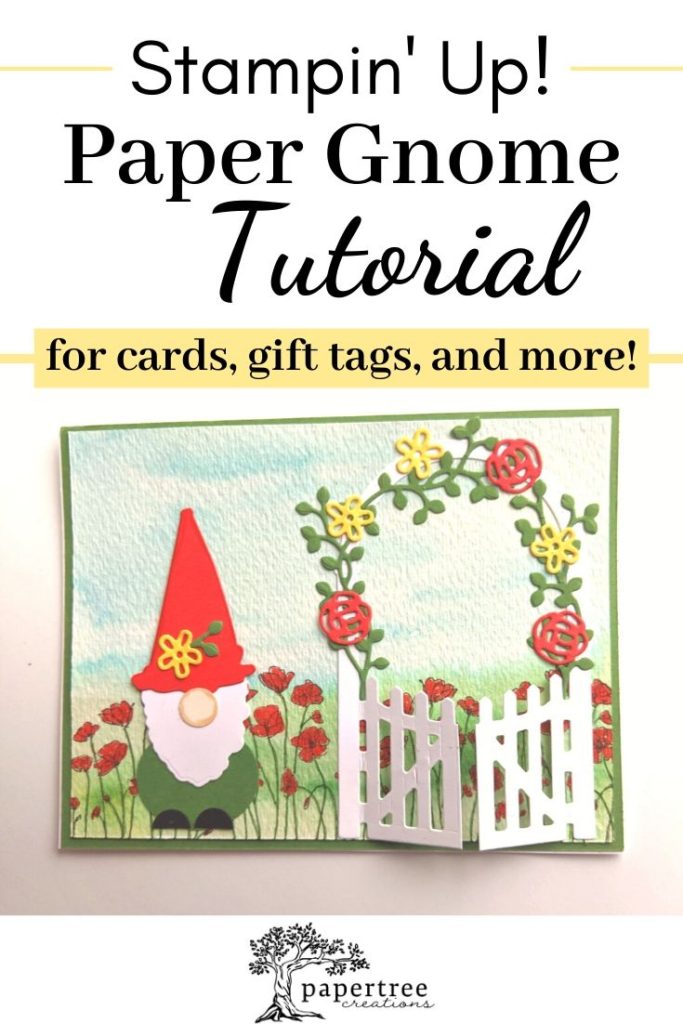
Over the past year, I’ve seen tons of adorable garden gnomes popping up in stores and in people’s yards. I love it so much, and I wanted to figure out a way I could incorporate them into my cards. Since Stampin’ Up! doesn’t have a gnome stamp set, I decided I was going to have to come up with my own way to create a gnome for my cards.
I had a lot of fun figuring out how to make my own gnome card, and I’ve laid out a tutorial for making the paper gnome below. Enjoy! This is perfect for spring, but it doubles as a cute Christmas craft!
Cardstock in color of choice (I list what I used below)
Designer Series Paper if you want a pattern for the body or hat
Click Here to learn more about Sale-A-Bration and my Free Give-away.
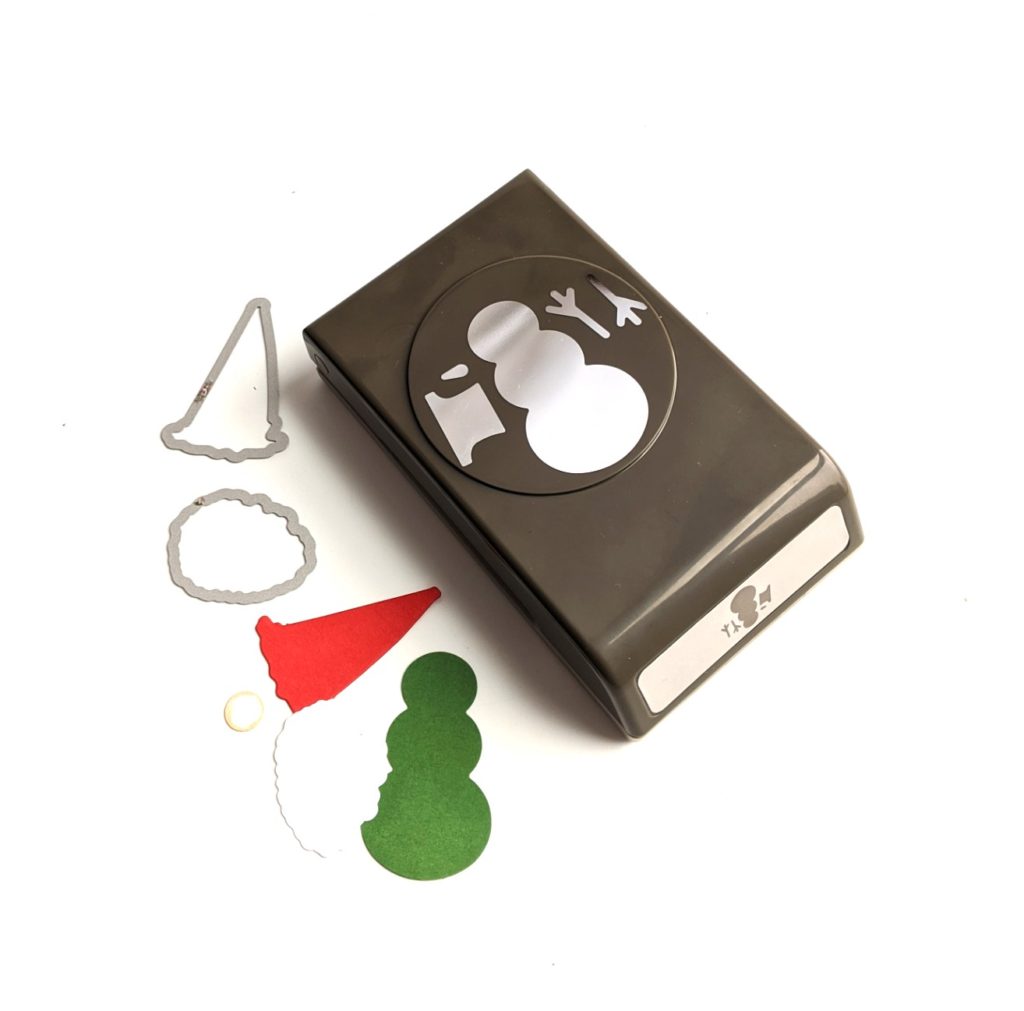
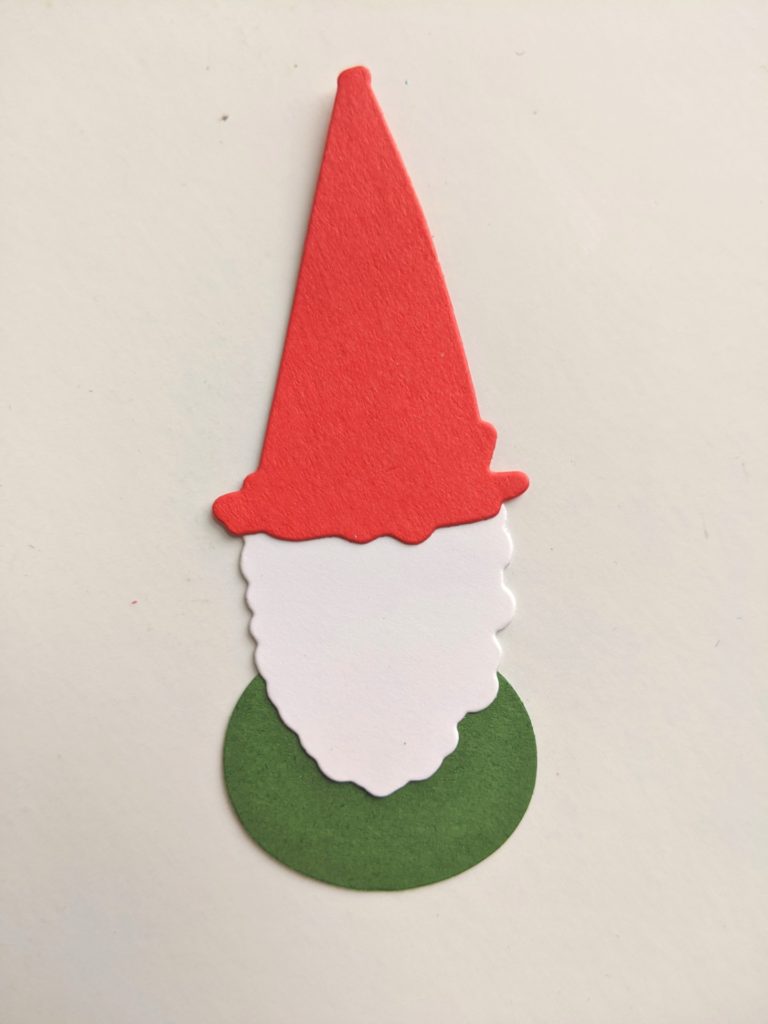
Paper Gnome Set-up Instructions
Using the larger pine cone outline die from the Beautiful Boughs Die Set, cut the beard from Whisper White Cardstock.
Using the smaller, single ship die from the Smooth Sailing Dies, cut the hat from Poppy Parade Cardstock.
For the body, use the Snowman Builder Punch in Garden Green Cardstock.
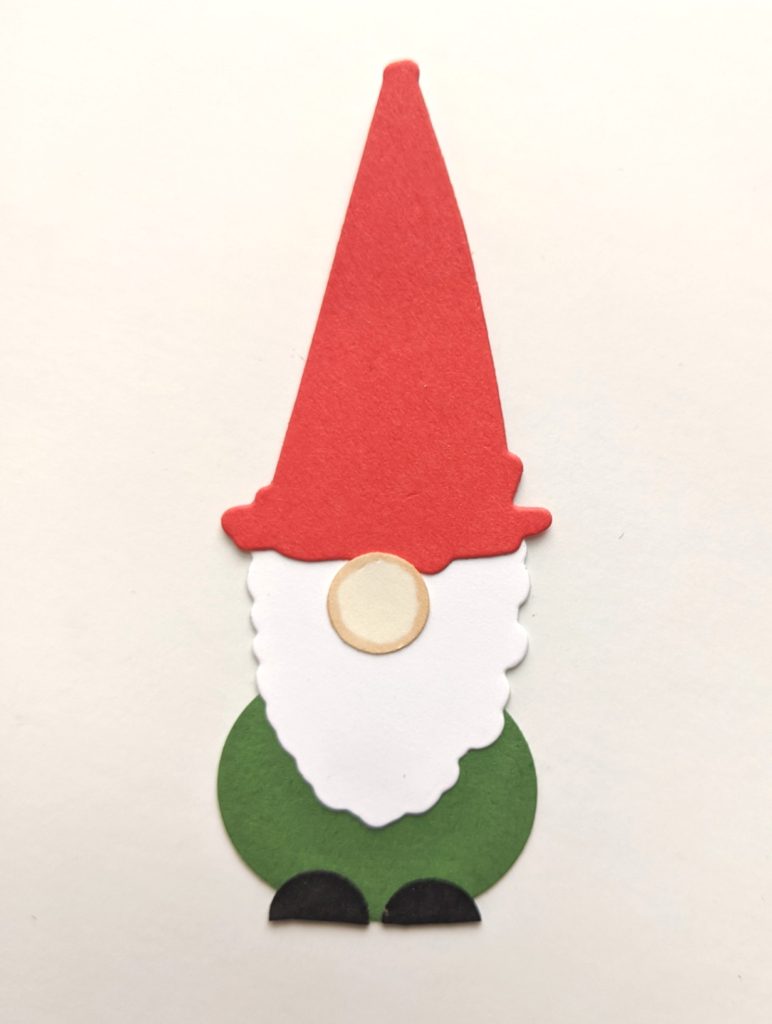
Use a small circle punch for the nose in Very Vanilla and shade the sides of it with the Ivory Stampin’ Blends by coloring the outside of the circle (or whatever marker/ink you happen to have).
Paper Gnome Assembly Instructions
1.Take the beard and glue it to the snowman.
2. Position the hat where you want it and glue it down.
3. Add the nose right below the hat. I also cut a circle in half out of black cardstock for shoes.
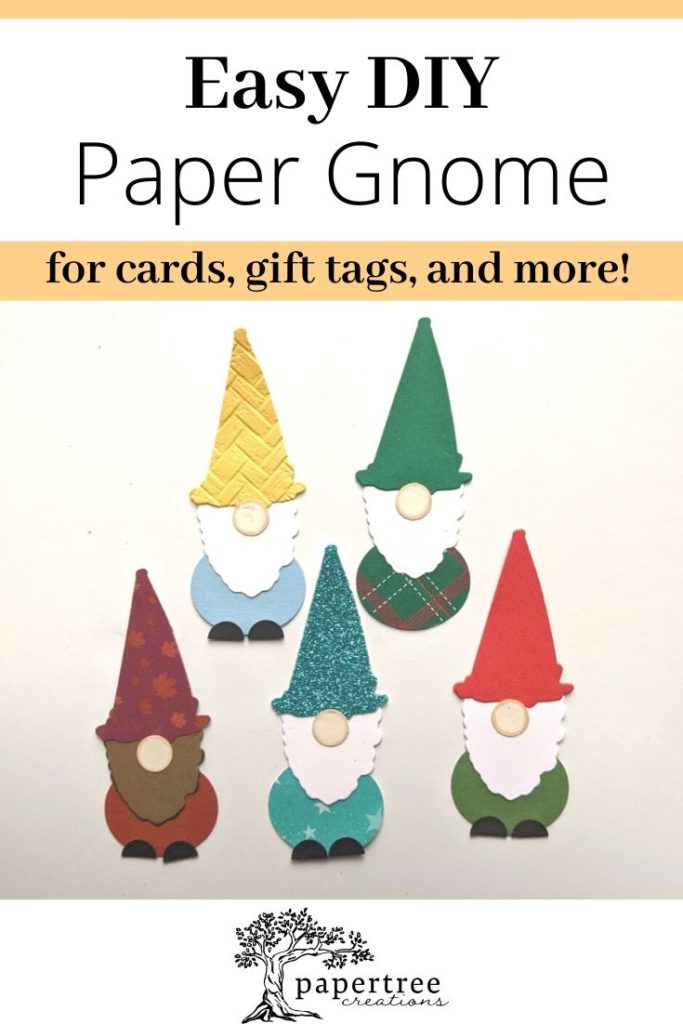
And that’s it! You can add these to cards or gift tags, or it’d be a fun craft for kids! You can also embellish them however you want with sequins, hearts, flowers, etc.
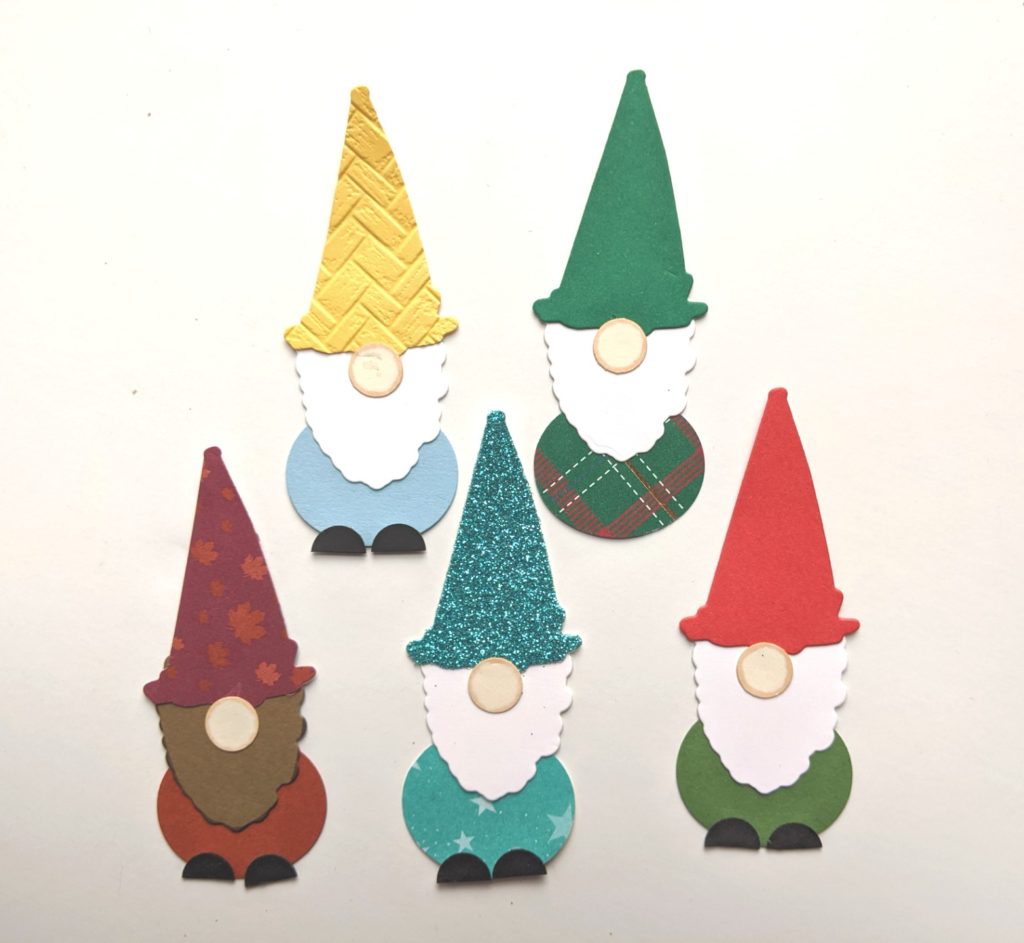
Here are a bunch more paper gnomes I made. I think they are adorable! You can do so much with them. Use patterned paper for their hat or body, emboss for more texture, or even use glitter paper to make a gnome wizard!
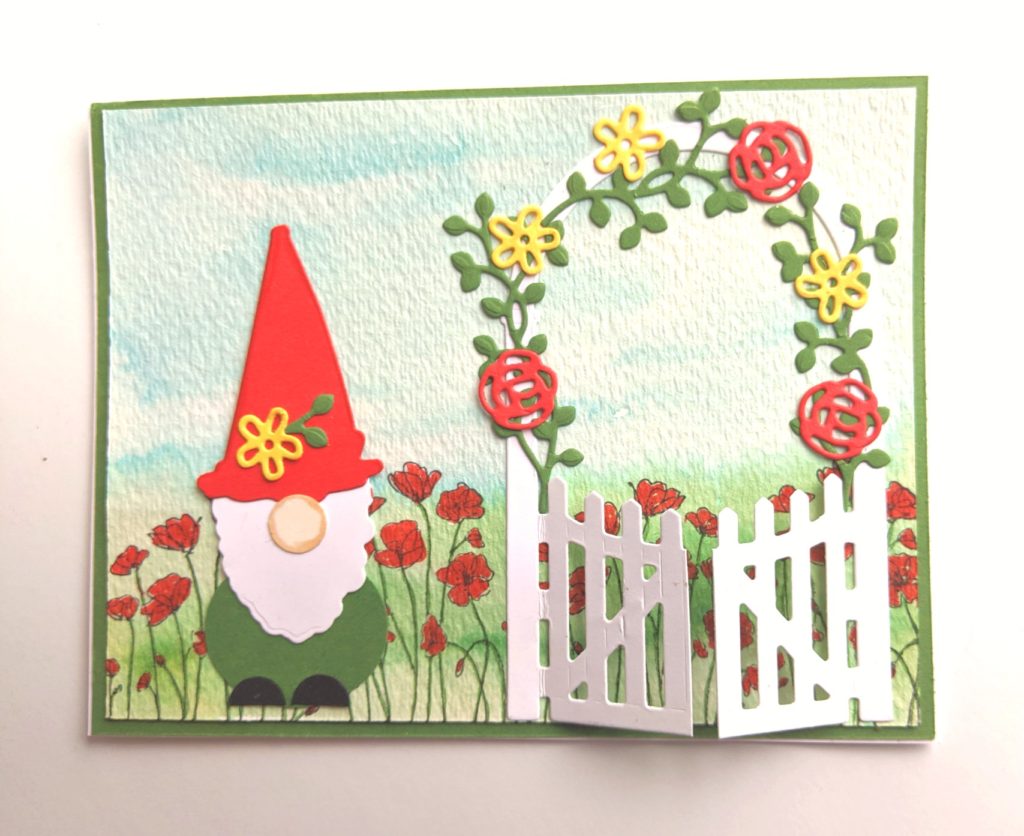
These paper gnomes are so much fun to make, and the possibilities are endless with them! Here’s a spring garden card I made using the gnome I created for this tutorial.
Just adorable! I hope you will try this and let me see what you come up with. Here is a tutorial for the card.
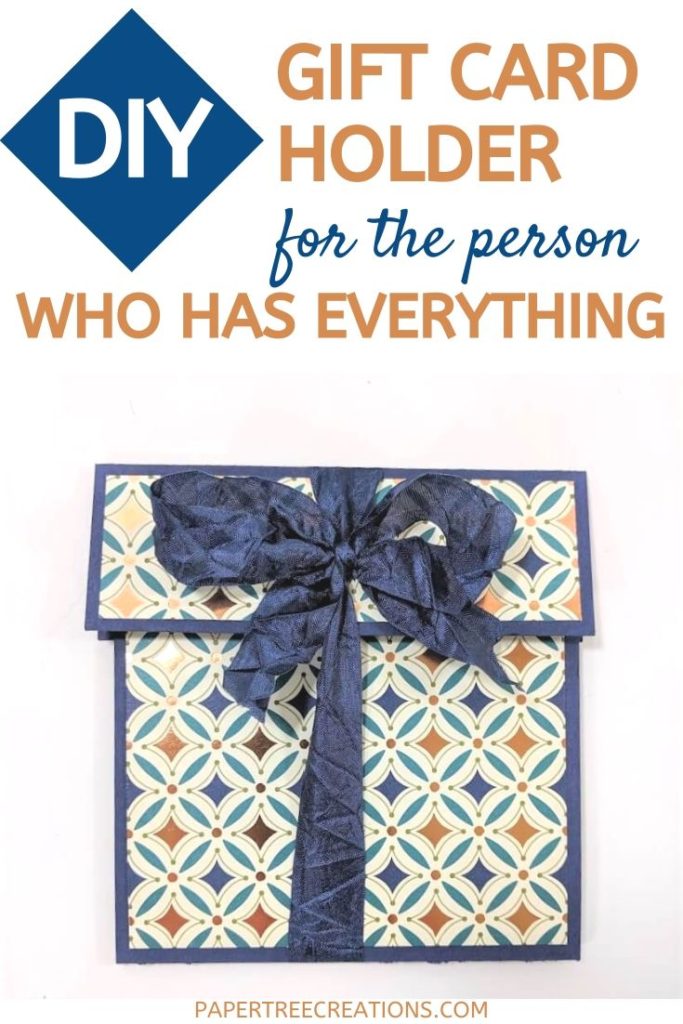
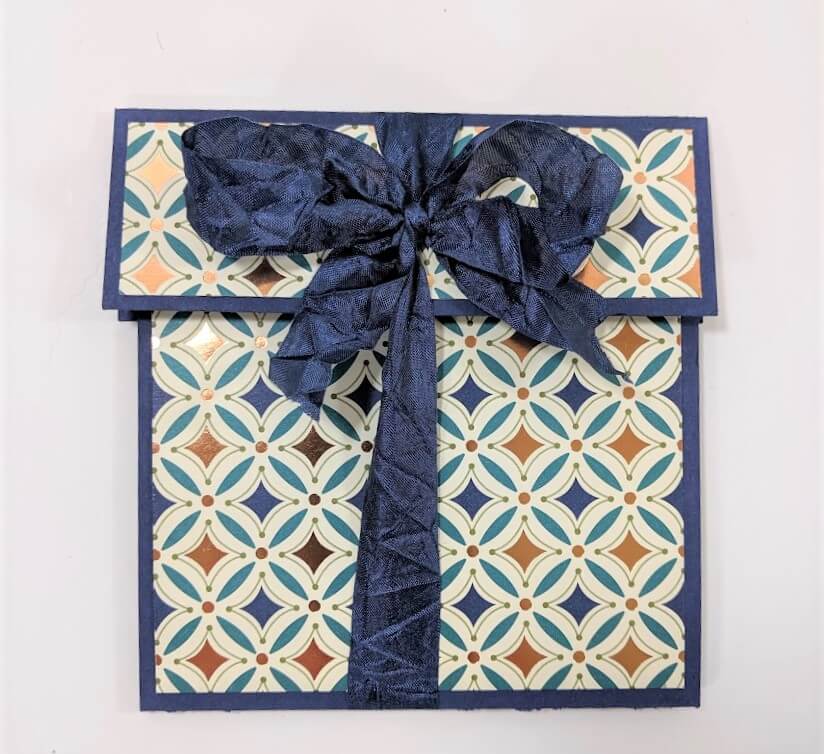
Here is a great gift card holder for that person (or persons!) in your life who has everything. We all have them. And we get them gift cards because we love them and want to do something for them. Here is a fun way to package that gift card! Keep reading for a DIY tutorial on how to make this cute gift card holder.
Gift Card Holder Tutorial
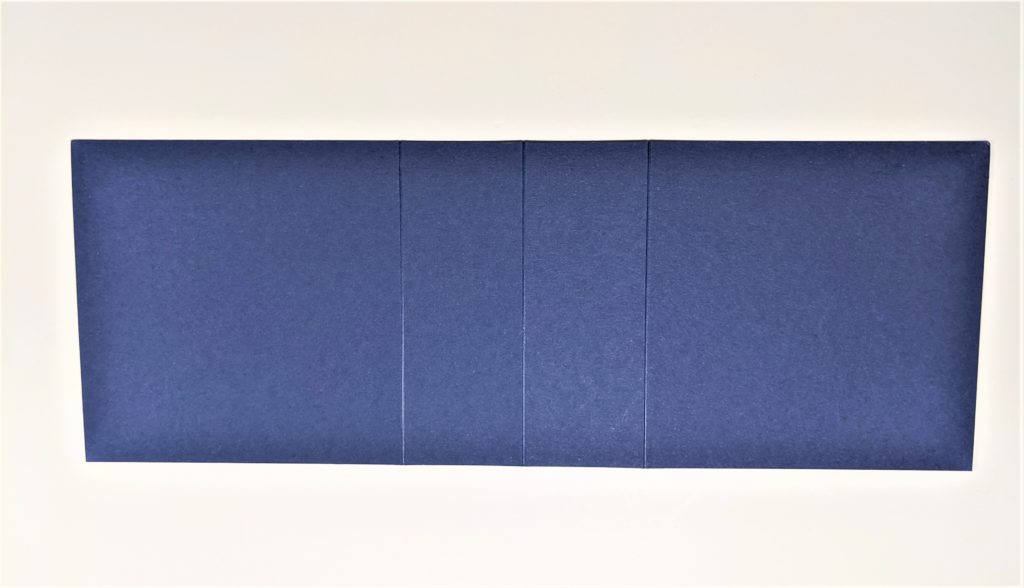
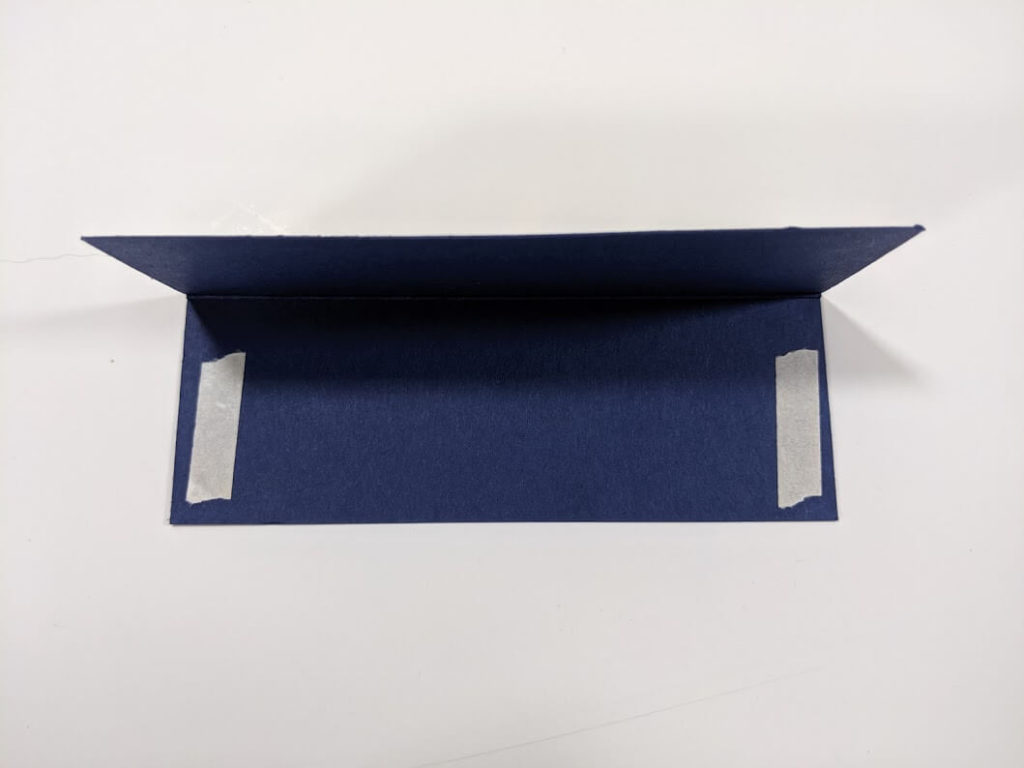
1. Cut desired color Cardstock (cs) to 4″ x 11″. Score in the horizontal position at 4″, 5 1/2″, and 7″.
2. Fold each score line as follows: Valley fold on the 4″ score, mountain fold on the 5 1/2″ score, and valley fold on the 7″ score.
3. Using Tear and Tape, adhere on the edge of the two undersides of the mountain fold. Using the Tear and Tape, make a pocket. It is important to use a strong adhesive when making these. Regular adhesive is not strong enough to hold it together. Fold to form your 4″ x 4″ present bottom card base with the tuck in fold on the inside of your card.
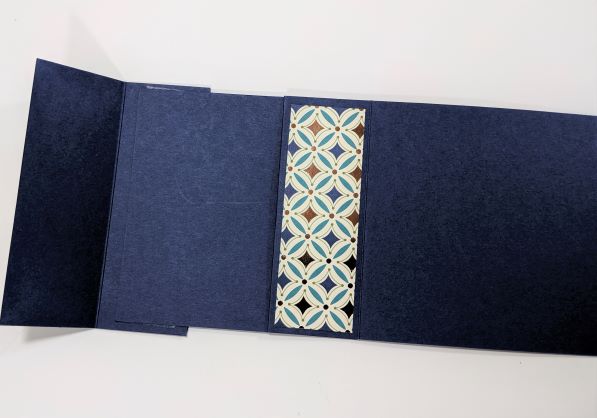
4. For the present top, cut matching cs to 3″ x 4 1/4″. In the vertical position, score at 1 1/2″ and fold. Using Tear and Tape, adhere the inside of the present top to the upper back of the present bottom. The fold of the present base is at the bottom. In the picture below, I put my tape a little too close to the sides. Remember that the top of the present is a little bigger than the bottom.
You can change the height of your present by where you attach the present top.
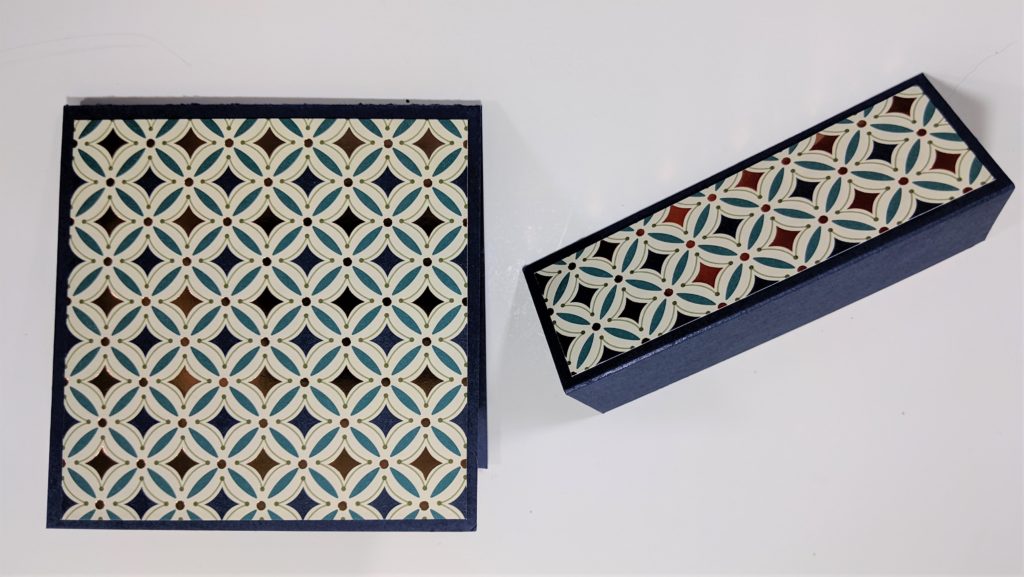
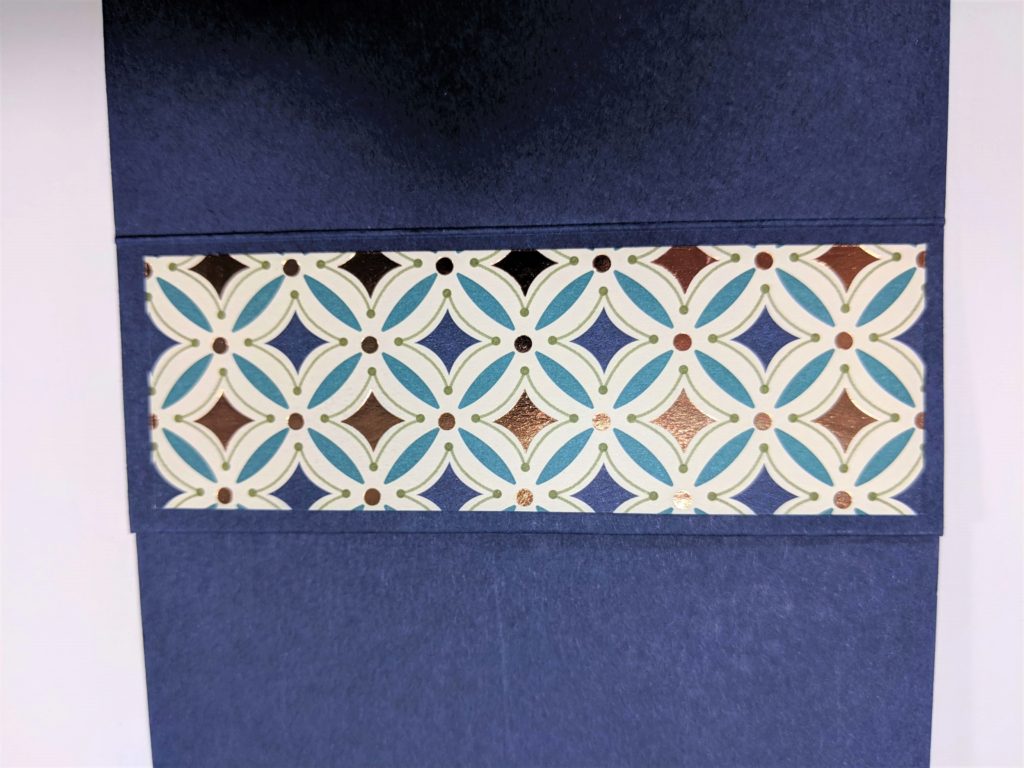
5. Cut and adhere the Designer Series Paper of your choice to 3 3/4 x 3 3/4 (for present bottom), 4 x 1 1/4 (for present top), and 3 3/4 x 1 1/4 (for inside the present).
6. Stamp your greeting on a piece of 3 3/4 x 3 3/4 piece of Whisper White of Very Vanilla cs. Glue to the inside of the present and tie it up with a length of ribbon and you have a cute gift card holder!
These are great for so many different occasions, such as birthday, graduation, wedding, or any other one you can think of. They are fun and easy to make and you can still give “a present” to your recipient. Have fun making them and if you have any questions, don’t hesitate to ask!
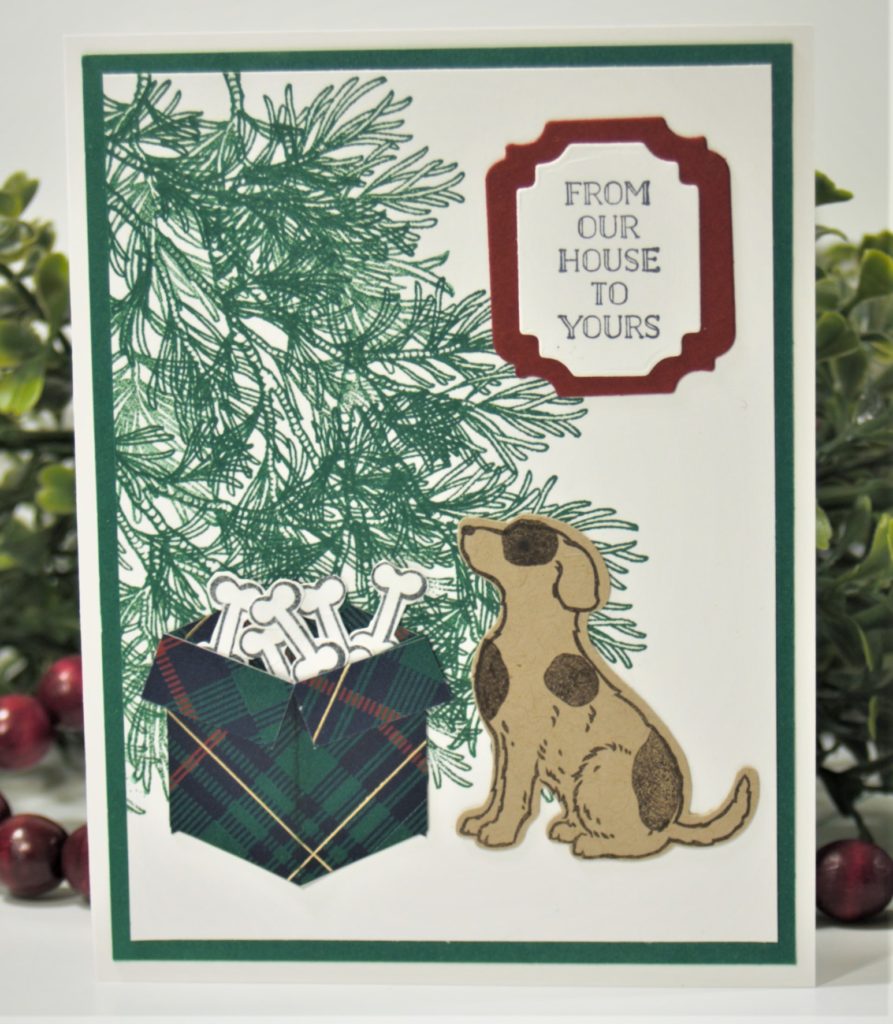
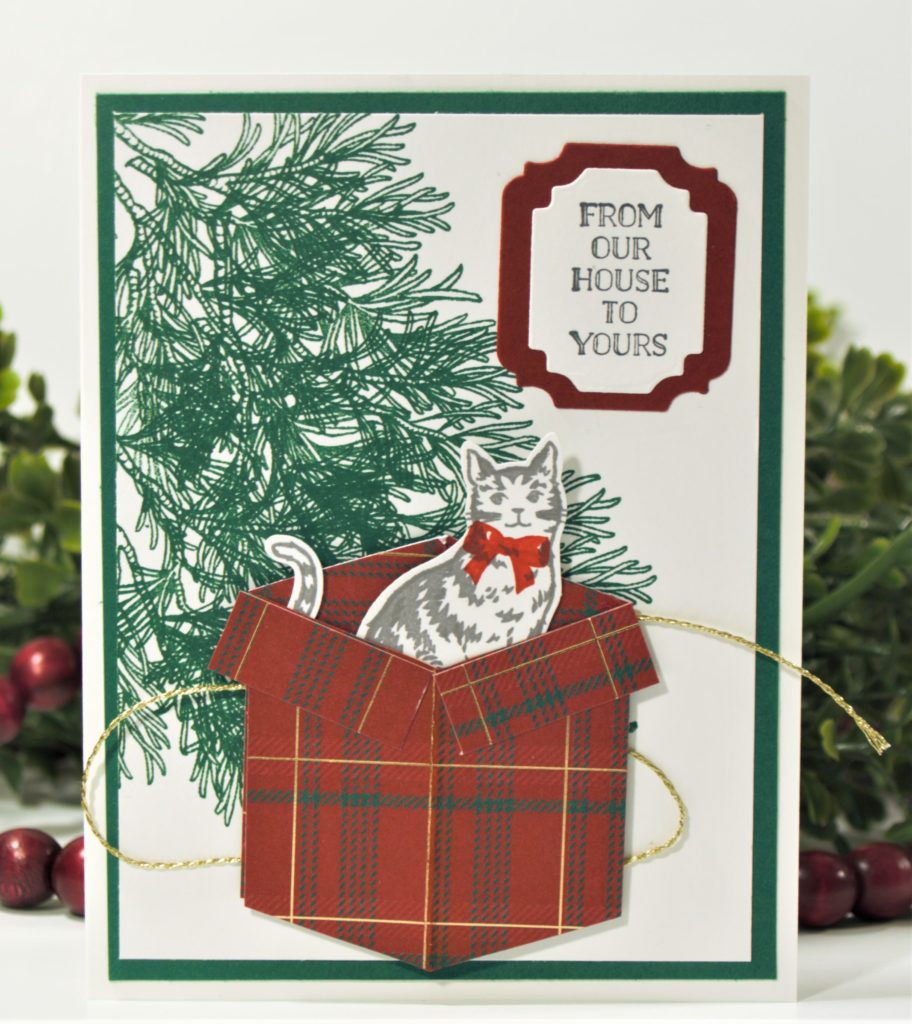
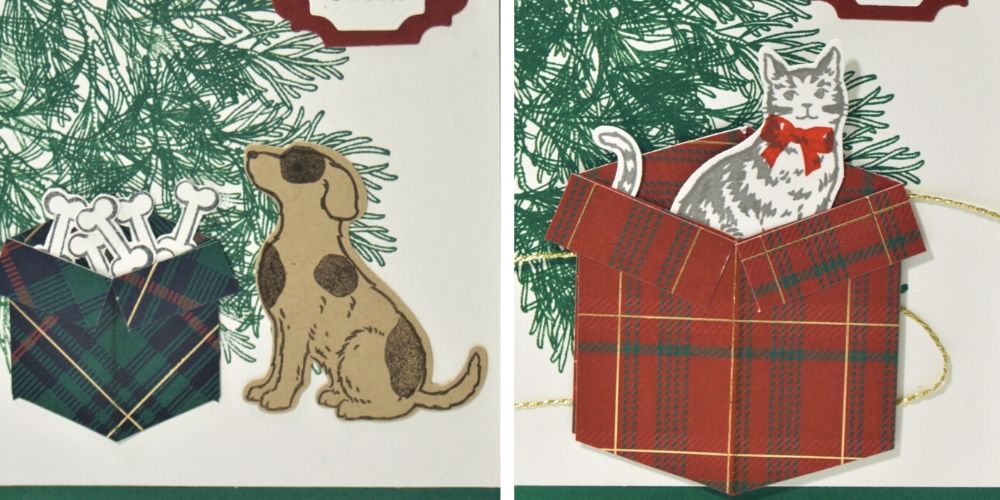
Many of us have pets that are like part of the family, and we don’t want to forget them when sending out our Christmas cards. Sometimes we even include them in our pictures we send. But for those of us who don’t want to try to get them to co-operate for the picture, here are cards that you can use with either a cat or dog.
I included a tutorial on how to make a box/present to put on the front of your cards. You can use it as a Christmas present or a birthday present on your own cards.
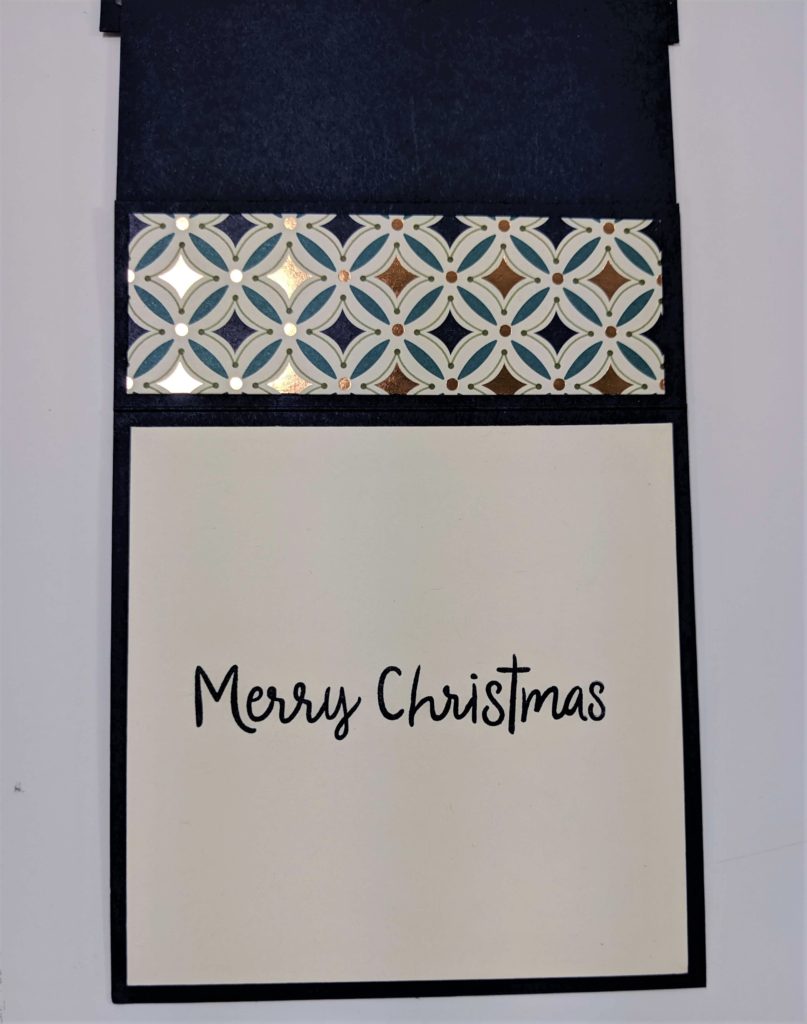
The greeting for both cards are from Itty Bitty Christmas and the die cuts for it are the Ornate Frames Dies. I am happy to report that both of these will be carrying over!
How to Make the Christmas Tree Background
1. Using the stamp set Peaceful Boughs, stamp the bigger branch in Shaded Spruce Ink, forming the shape of a Christmas tree on the 3 3/4 x 5 piece of cardstock. I mentioned that this is one of my favorite stamp sets in a previous post. This is another way to use it with just the stamp. And I haven’t even gotten to the pine cone yet!
2. Fill in some branches with the smallest branch stamp until you get a tree you like. Leave some space at the bottom so it doesn’t look like the cat or dog are sitting in the tree!
I did add an extra spot on the dog by just inking the one spot and adding it where I thought it would look best.
2. Punch out the images with the matching Cat Punch or the matching Dog Punch. If you don’t have the matching punches, you can fussy cut them with scissors.
3. For the dog card, stamp a bunch of bones and fussy cut them out.
How to Make the Tuck-in Present for Your Card
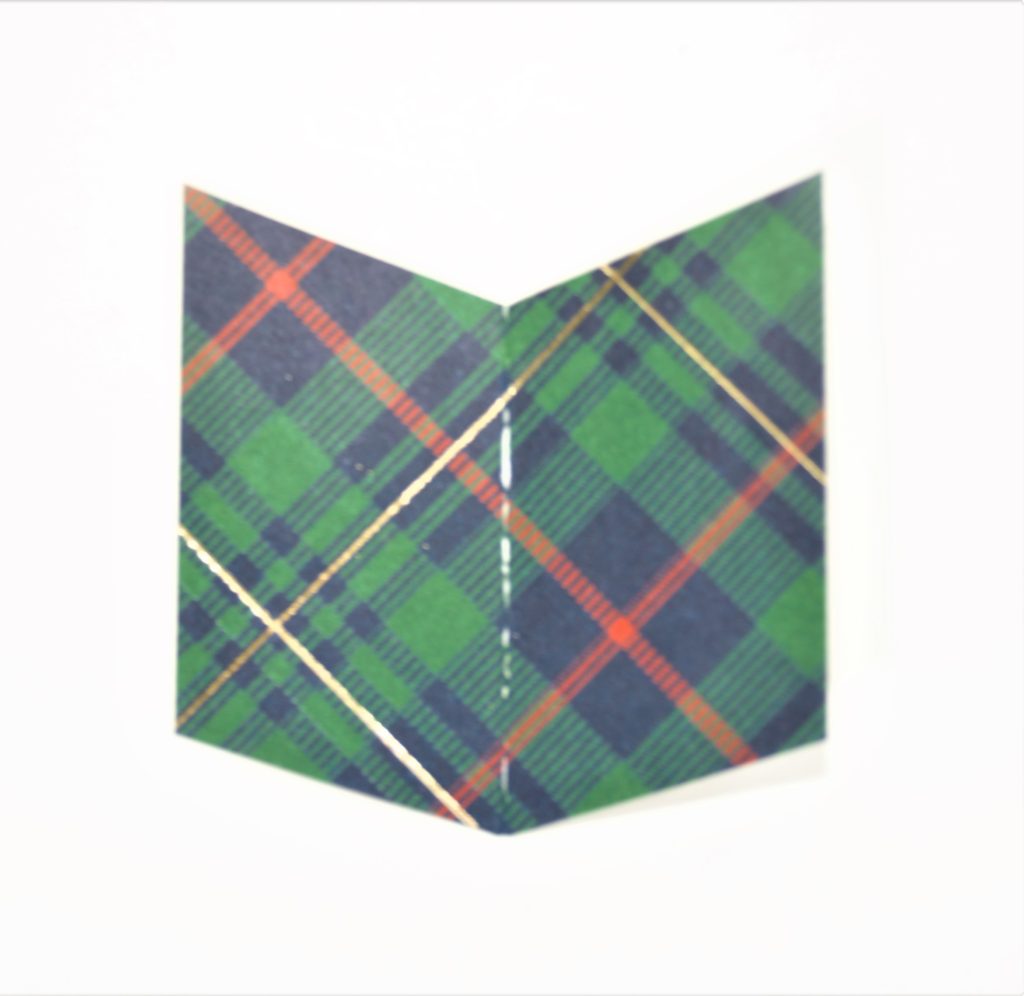
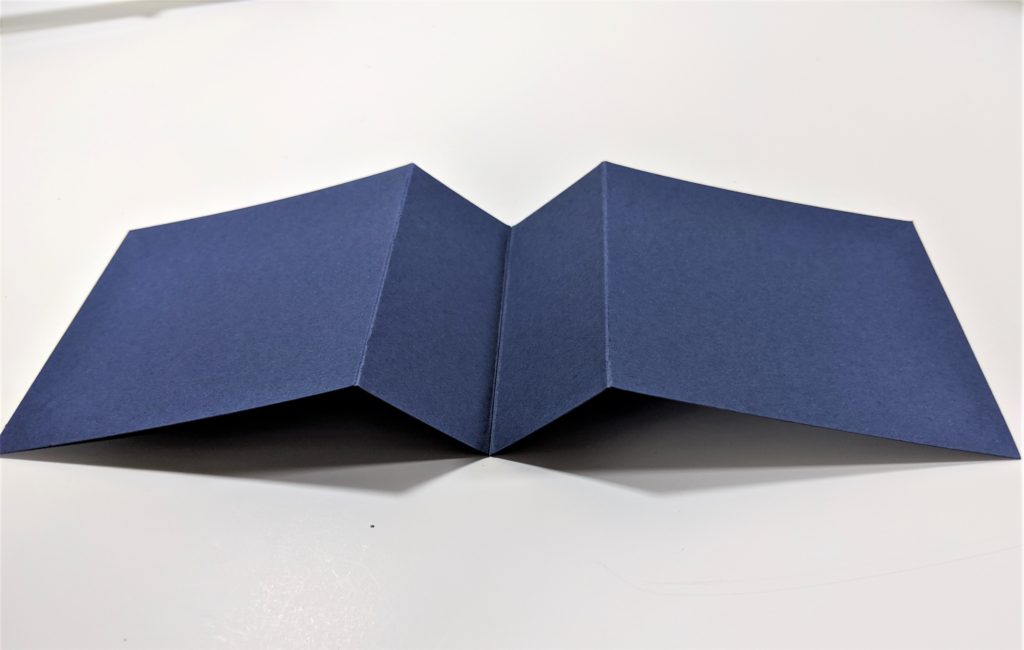
Do you remember the first time you learned how to draw a 3-D box? I remember thinking it was so cool and drew them endlessly for a while. This box took me back to that time, and I had so much fun making them. I hope you enjoy it too!
1. To make the tuck-in box, take two 2 1/2 inch squares of paper. If you want a smaller box like I made in the dog card, use two 1 1/4 inch pieces for the box. I used the Wrapped in Plaid Specialty Designer Series Paper for both projects.
2. Fold them in half with the design you want on the inside. If you look at my pictures, I wanted the green plaid to be what was displayed for my present, so I folded it with the red stripes on the outside. I know it’s confusing, but bear with me!
3. Trim the edges of the squares at an angle (however sharp you want) so they look like a book when opened. Save the scraps as you’ll be using them for the present’s flaps later on.
Image 1: Folded and trimmed. Image 2: Open like a book.
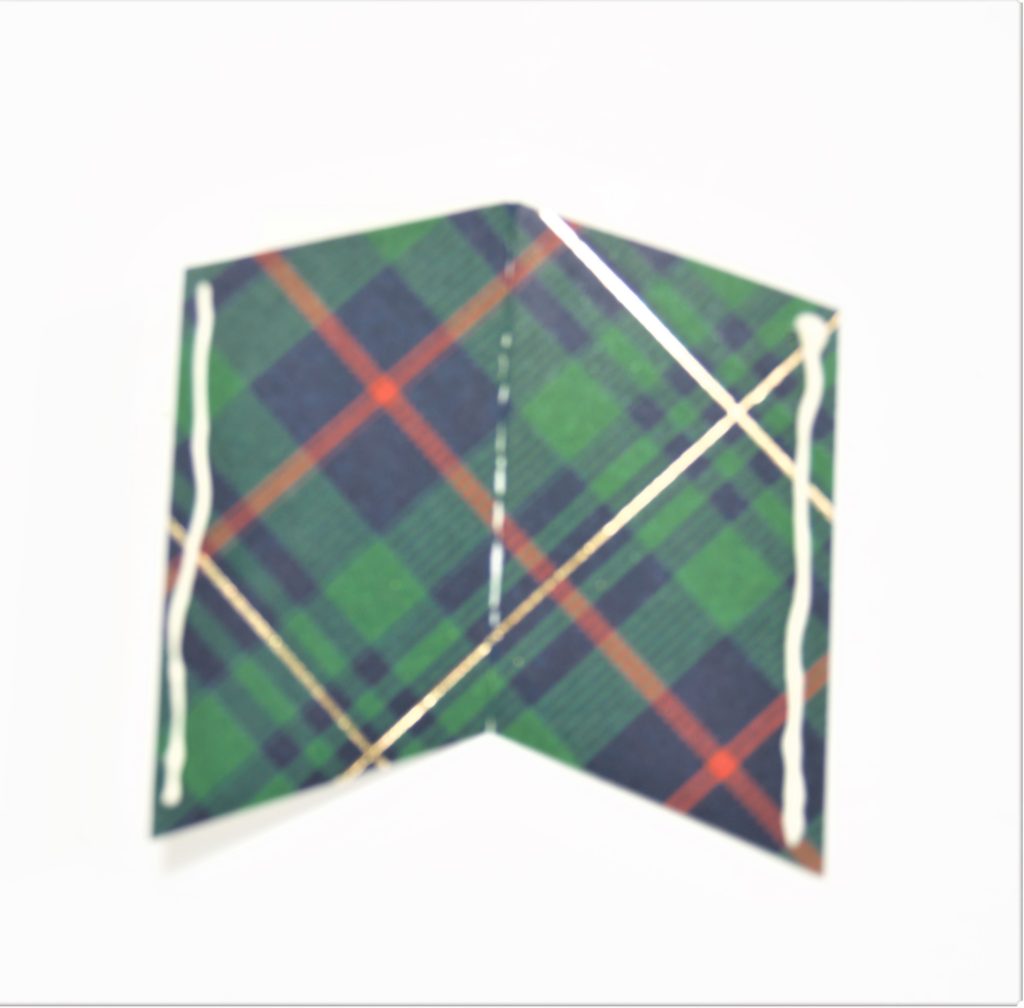
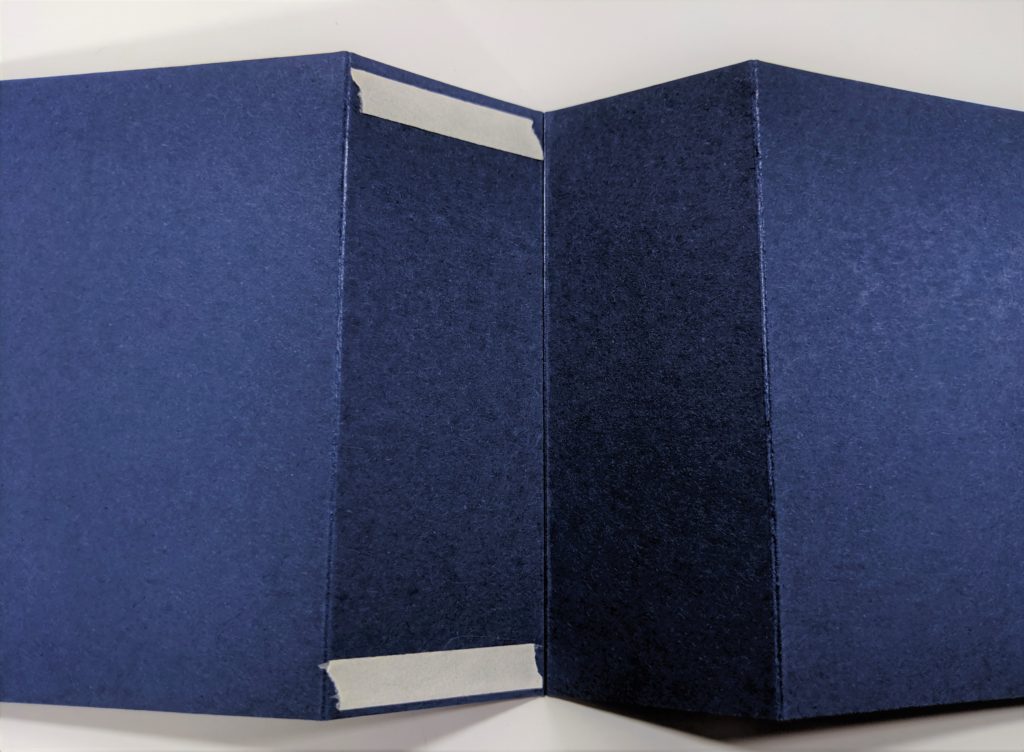
4. Put a line of glue on the left and right edges of ONE of the squares (the one with the pointy edge up). The glue should be on the side of the paper that you want to be showing in your finished product.
5. Take the other square (the one with the pointy edge down) and place it on top of the first square, matching the points with each other so it looks like this:
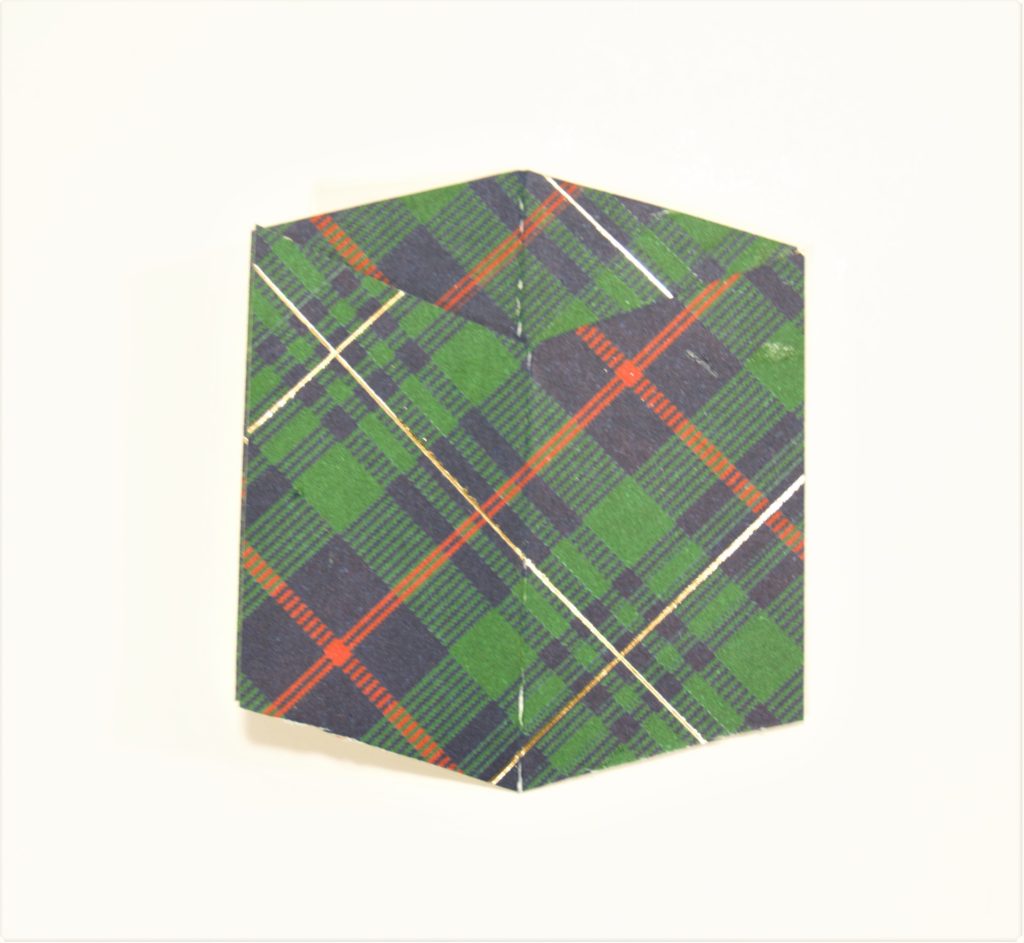
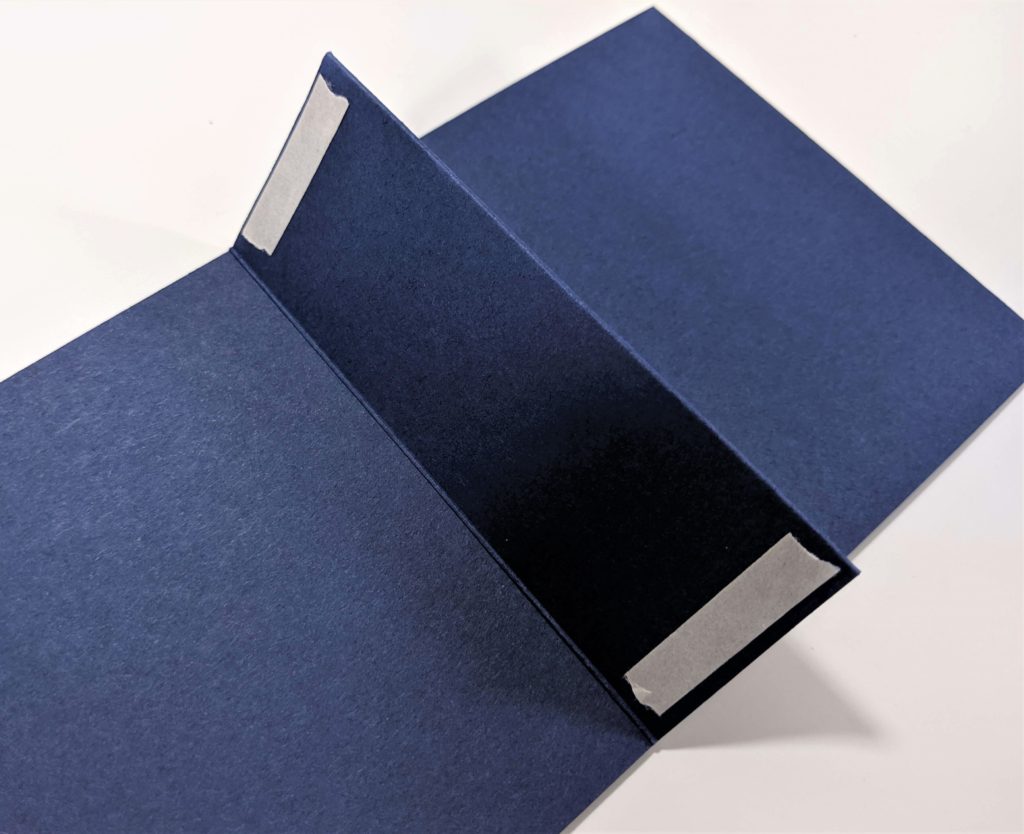
6. You’re almost done! Now, take the scraps you saved while you were trimming your squares. Trim two pieces of paper that are 1/2 x 1 1/4 inches. These are the flaps for your present.
7. Glue them to the box to make the flaps, like in this picture:
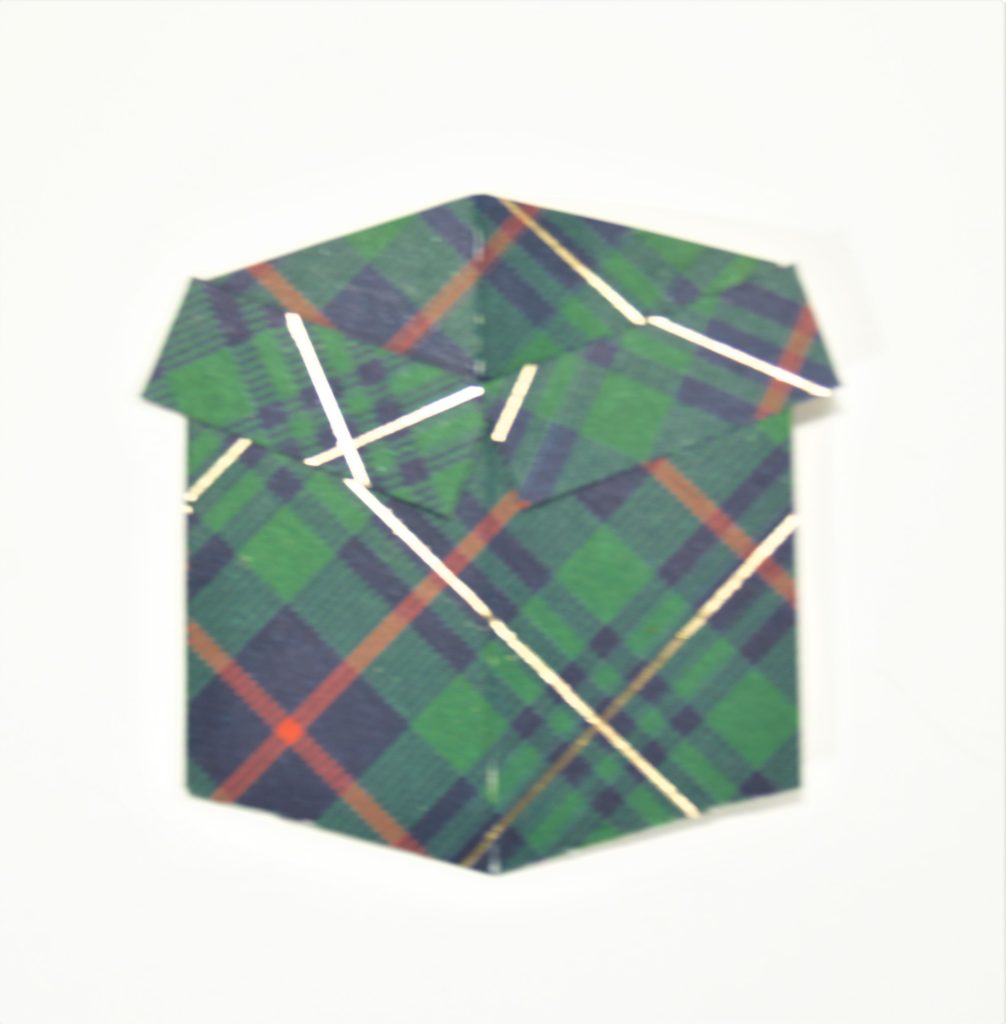
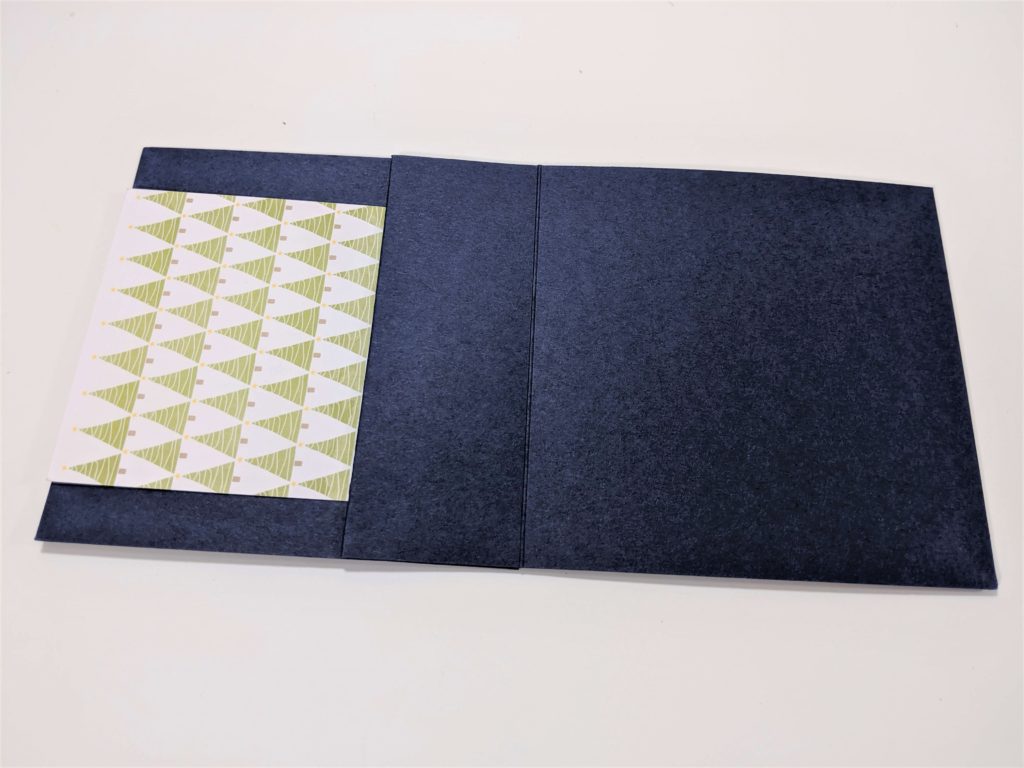
And your shiny new tuck-in present box is done! Now you can spruce it up by adding in dog bones or your cat—or whatever else you want to stick in it! Just use a little bit of glue and arrange them however you want!
I hope you enjoy making these cards! If you do, please share them with me on my Facebook Page.


")